How to Read and Interpret Dental X-Rays: Beginner’s Guide for Students

Dental X-rays are one of the most valuable diagnostic aids in dentistry. To the student, learning how to interpret them correctly forms the basis of correct diagnosis, treatment planning, and effective communication with the patient.
Although it may at first appear to be an overwhelming task, with constant practice a systematic approach will quickly promote confidence.
This tutorial breaks down the basics into an easy-to-follow, step-by-step guide to understand what to look for, where to look, and how to interpret what you see.
Types of Dental X-Rays You Must Know
How to read dental x-rays? Before answering this question, you must understand the types of dental x-rays.
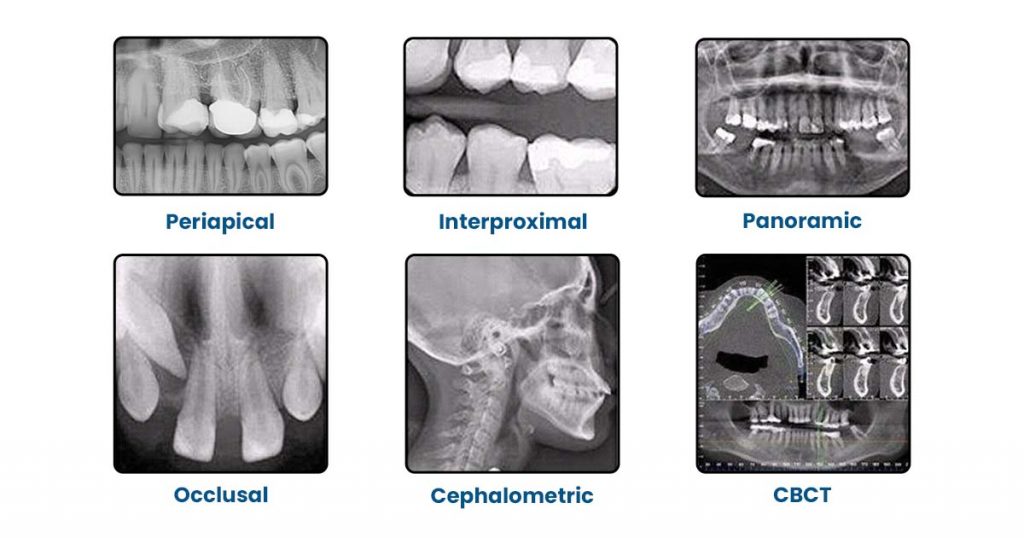
a) Periapical X-Rays
Used for:
- Assessing Root Structure
- Periapical pathology (abscess, cyst, granuloma)
- Root canal anatomy and Working Length estimation
b) Bitewing X-Rays (BWX)
Used for:
- Interproximal Caries Detection
- Bone level evaluations.
- Existing Restoration placement.
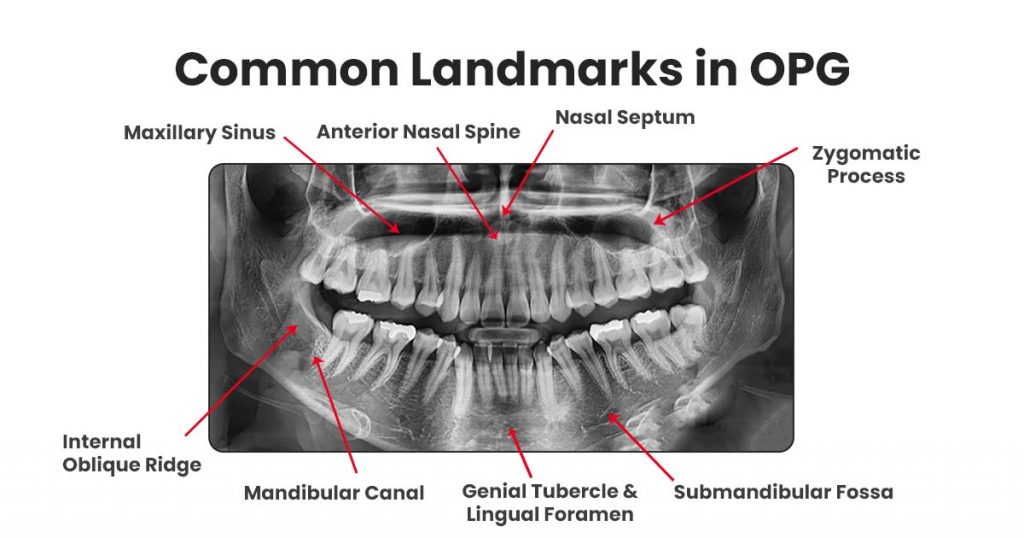
c) Panoramic X-Rays (OPG/PAN)
Used for:
- Orthodontics evaluation before starting the treatment.
- Impacted third molar.
- Fractures of the jaw
- TMJ evaluation
- Developmental anomalies
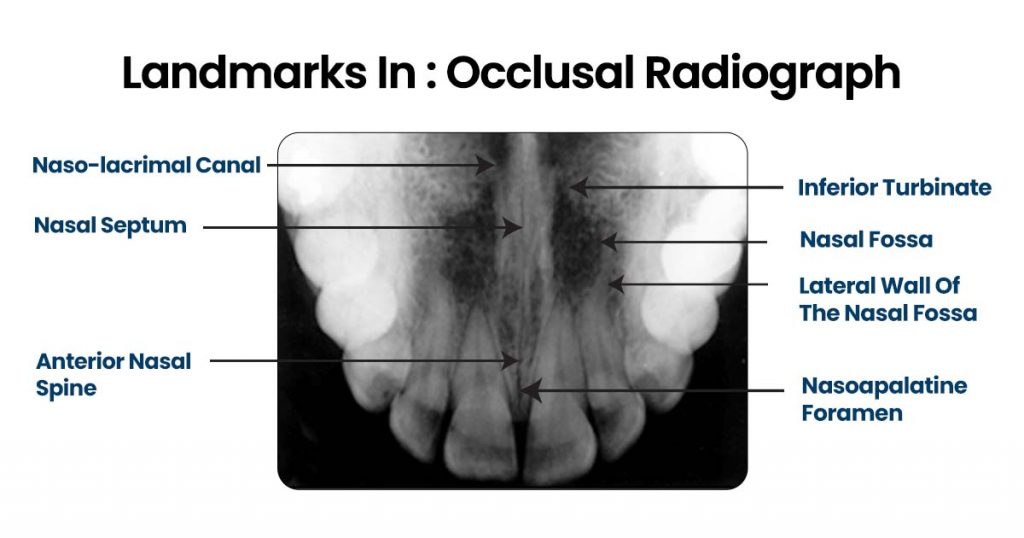
d) Occlusal X-Ray
Used for:
- Captures a wide view of the maxilla or mandible to detect large lesions, fractures, or impacted teeth.
- Shows buccal–lingual tooth position.
- Helpful for locating foreign bodies or supernumerary teeth.
- Useful for trauma cases, identifying jaw fractures and anterior pathologies.
- Useful for children or those with gag reflex issues.
e) Cone Beam Computed Tomography (CBCT)
Used for:
- Implant planning.
- Evaluation of bone, nerves, and roots in 3D.
- Useful in identifying complex pathology.
f) Cephalometric
Used for:
- Gives a side-view of the skull and jaws.
- Helps assess jaw growth and alignment.
- Measures Skeletal and Dental Relationships.
- Used to track Orthodontic treatment progress.
Step-by-Step System to Read Any Dental X-Ray
A systematic approach stops you from missing major diagnoses. This is a simple check list:
Step 1: Image Quality Check
Ask yourself:
Does it make sense, and is it well-exposed?
Are all necessary structures visible?
Does it have distortion or overlapping contacts? Otherwise, the photograph may have to be retaken.
Step 2: Identify the Tooth and Orientation
Always check:
- Upper or lower?
- Right or left?
- How many roots? (Helps with orientation)
A common trick:
Maxillary teeth have Maxillary Sinus shadows → Mandibular teeth have denser bone (radiopaque).
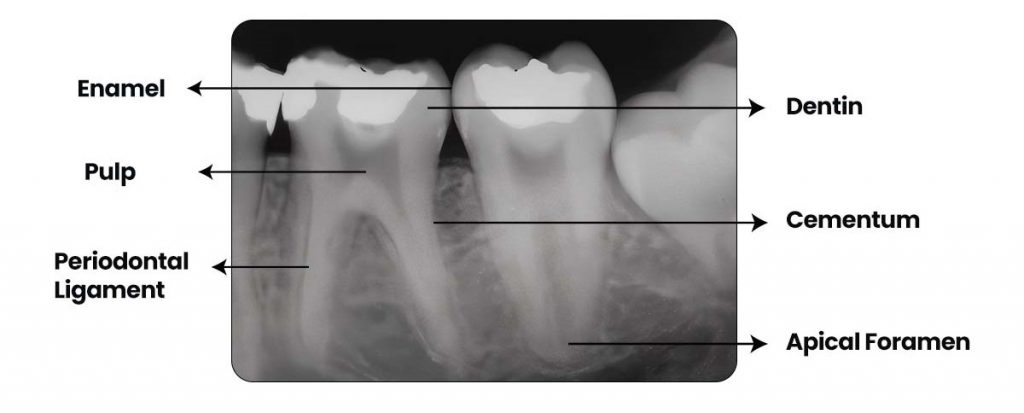
Step 3: Evaluate Crown Structures and Look for any of the following
- Interproximal caries (radiolucent notch near contact area).
- Overhangs, leakage of Restorative Margins.
- Fractures or Cracks of the crown.
Step 4: Analyze the Roots. Check for
- Number of roots (variation common)
- Root curvature
- Widened PDL space. Lamina dura should be continuous and radiopaque.
- Internal or external root resorption
Step 5: Periapical Region. Look for:
- Dark radiolucency → Possible abscess, granuloma, cyst
- Sclerotic bone changes
- Loss of the lamina dura
- Periapical radiopacities may indicate Cementoblastoma, condensing osteitis
Step 6: Evaluating Bone Levels Important for periodontal assessment:
- Normal bone is 1–2 mm below CEJ Horizontal bone loss Vertical defects (angular)
- Furcation involvement in molars
Step 7: Locate Anatomical Landmarks
Recognition of normal anatomy prevents misdiagnosis.
Maxillary Landmarks
- Maxillary sinus
- Zygomatic process
- Nasal fossa
- Incisive foramen
Mandibular Landmarks
- Mental foramen
- Inferior alveolar nerve canal
- Mylohyoid ridge
- Submandibular fossa
Students often confuse mental foramen with a periapical lesion, always locate the canal first.
Common Radiographic Findings and What They Mean
Quick reference to simplify interpretation:
| Finding | Appearance | Possible Meaning |
|---|---|---|
| Interproximal caries | Triangular radiolucency | Enamel/dentin decay |
| Widened PDL space | Dark line around root | Trauma, occlusal load, early pathology |
| Loss of lamina dura | Fuzzy or absent white border | Inflammation or periodontal disease |
| Periapical radiolucency | Round dark shadow | Abscess / granuloma / cyst |
| Bone loss | Lowered bone height | Periodontitis |
| Radiopacity in crown | Overhang or excess material | Poor restoration, calculus |
| Radiopaque mass at root | Dense bone | Condensing osteitis / cement blastoma |
Radiographic Clues Every Student Should Master
a) Detection of early caries
- They most often appear faint radiolucent lines.
- Look carefully near contact points
b) Signs of Periodontal Disease
- Crestal irregularity Bone loss, either horizontal or vertical A furcation radiolucency
c) Endodontic pathology
- A loss in the lamina dura
- Dark periapical area Internal/external respiration
d) Value of Restoration. Always check for
- Margins
- Overhangs
- Voids
- Overextensions
5 Tips for Students to Improve X-Ray Interpretation
- Compare old and new radiographs for trends.
- Zoom in on suspicious areas without over-relying on enhancement tools.
- Employ a step-by-step approach each time.
- Practice with classmate radiographs for variation.
- Understand anatomy extremely well-it prevents misreading pathology.
Conclusion
Mastering dental x-ray interpretation is a fundamental skill that every Dentist must develop early. By understanding Digital Radiography basics, from identifying caries and bone loss to recognizing changes in the PDL space, you gain the confidence to diagnose accurately and plan effective treatment. With consistent practice and careful observation, reading dental x-rays becomes easy, helping you deliver safer, more precise, and patient-centered care.
FAQ
Look for a radiolucent triangle at the contact point. If it extends into dentin, it becomes more obvious and darker.
Trace the inferior alveolar canal. It is associated with mental foramen. Periapical lesions usually distort PDL and lamina dura; mental foramen does not.
Normal: 1–2 mm below CEJ Abnormal: Any bone loss greater than 2 mm with irregular contours.
A well-defined radiolucent (dark) area at the apex, with loss of lamina dura, is the classic sign.
Practice daily. Take notes. Use a structured checklist. Interpret images with your seniors or mentors for verification.

No Comment