
Interproximal Reduction (IPR): A Guide to Safe and Effective Enamel Reduction
Ever found yourself stuck in tight contact, unsure if you're removing enough enamel or maybe too much?
You’re not the only one. Whether you’re a newly licensed dentist or a seasoned orthodontist, it is common to possess a desire to master the artful technique of ‘Interproximal Reduction’ or ‘IPR’. This blog deconstructs everything you need to know about the technique.
What is IPR?
Interproximal Reduction or "Tooth Stripping" is the reduction of a small amount of enamel from the lateral aspects of the teeth, typically between the anterior teeth or premolars, to provide space for alignment without removing teeth. It is particularly relevant in:
- Mild crowding of the teeth
- Clear aligner treatment
- Black triangle closure
How Much Enamel Is Safe to Remove?
It is imperative to know the safe enamel reduction limits to avoid the causation of post-operative sensitivity or structural damage in the long term. The following tables provide guidance on the recommended enamel Interproximal reduction for each contact point between teeth.
Maxillary Arch
| Tooth Contact | Max IPR Limit |
|---|---|
| Central Incisor – Lateral Incisor | 0.9 mm |
| Lateral Incisor – Canine | 0.9 mm |
| Canine – First Premolar | 1.3 mm |
| First Premolar – Second Premolar | 1.33 mm |
| Second Premolar – First Molar | 1.31 mm |
| First Molar – Second Molar | 1.4 mm |
It is important to note that the enamel thickness varies among individuals and populations; therefore, these safe limits must be treated only as a general guideline.
Mandibular Arch
| Tooth Contact | Max IPR Limit |
|---|---|
| Central Incisor – Central Incisor | 0.7 mm |
| Central Incisor – Lateral Incisor | 0.72 mm |
| Lateral Incisor – Canine | 0.72 mm |
| Canine – First Premolar | 0.88 mm |
| First Premolar – Second Premolar | 1.17 mm |
| Second Premolar – First Molar | 1.27 mm |
| First Molar – Second Molar | 1.45 mm |
But it does NOT end here! Post-IPR care is crucial and polishing and fluoride application are not optional but essential steps to protect the enamel. They help to remineralize the reduced surfaces, minimize sensitivity, and prevent long-term damage.
What Are the Tools for IPR?
There are multiple instruments used in IPR that we choose depending on the tightness of the contact point, stage of the procedure, patient comfort, and the expertise of the clinician. Superior quality dental products quicken the process and make it more predictable. Below are the most popular tools used:
1. IPR Burs
IPR burs are used with airotor handpieces. They can be of various kinds, depending on the surface coating, grit, shape, and length.
Types Based on Material & Coating
- Diamond-Coated Burs: Smooth and efficient for enamel removal
- Carbide Burs: Aggressive cutting, typically for posterior teeth
Types Based on Shape
- Flame or Needle-Shaped: Ideal for tight anterior contacts
- Round-End Taper: Ideal for posterior areas
Indications of IPR Burs
- When quick reduction is called for
- Where minimum vibration is called for
- Where more contact surface area is involved
You can get a variety of IPR burs from top dental equipment suppliers online, at the best dental store in India.

2. IPR Strips
IPR strips are manual or motorized instruments that enable gentle, controlled reduction particularly in anterior contacts.
Depending on Mode of Use, They May Be of Two Types
- Manual Strips: Double-ended or single-ended with rough surfaces; best for small IPR adjustments and finishing
- Mechanical Strips: Driven by a reciprocating handpiece; best for speed and consistency
Indications of IPR Strips
- Minor enamel reduction
- Polishing and finishing after bur IPR
- Contour adjustments in aligner treatments
Most dental instruments online have multi-grit strips that can both cut and polish within one instrument.
3. IPR Blades and Saws
These are thin, flat, saw-like instruments that are either used manually or attached to a contra-angle handpiece.
Common Varieties
- Metal IPR Saws: To disrupt contact points
- Blade Strips: To finish and polish
- Oscillating Blades: For powered IPR handpieces
Indications of IPR Blades and Saws
- To open closed contacts
- Posterior areas that are difficult to access
How to Pick the Right Interproximal reduction IPR Tool?
The choice of IPR tool depends on the case complexity, tooth morphology, and your preferred method (manual, rotary, or oscillating). Here's a breakdown of how to interpret the code on burs and the color code on IPR strips to help guide your selection:
1. Understanding Bur Codes
IPR burs come with codes that indicate the shape, size, and grit. Here's what the code typically means:
The Bur Name = Shape + Size + Grit
- Bur Shape Code
Example: TF refers to Tapered Flat end
- Bur Dimensions
Example: 11, 12, 40. These numbers indicate bur dimensions — typically the diameter at the widest point or length of the cutting surface in tenths of a millimeter.
- Grit/Finishing Type
Example: C refers to Coarse; F refers to Fine
Example: TF-12EF
- TF = Tapered Flat End
- 12 = 1.2 mm diameter
- EF = Extra Fine grit (used for finishing)
Color Coding
Dental burs are often color-coded (white, yellow, red, blue, green) in increasing order of the grit size (abrasiveness) that help clinicians quickly select the right bur for cutting, shaping, finishing, or polishing,
Application Tip:
- Use coarse burs for faster enamel removal (initial reduction).
- Switch to fine or extra fine for finishing and smoothing enamel surfaces.
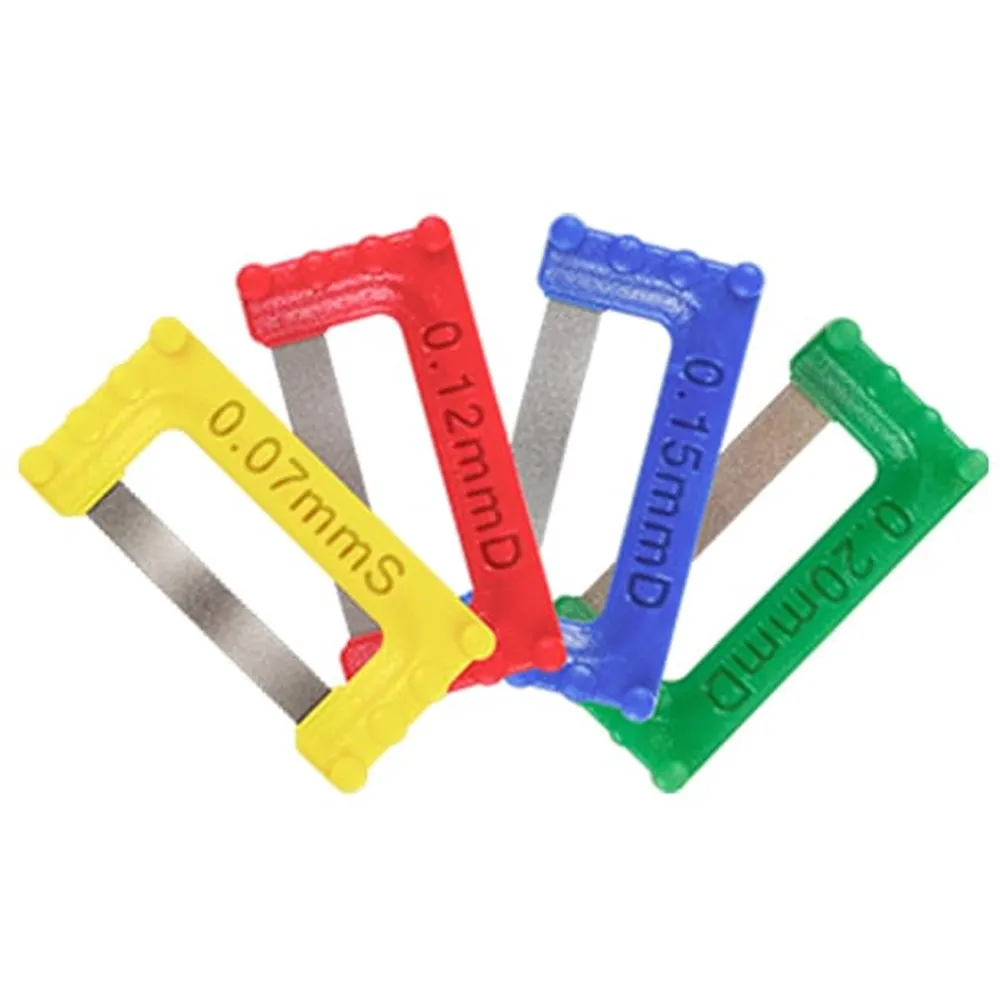
2. Understanding Strip Color Codes (Manual/Oscillating IPR)
Color coding for strips indicates thickness and abrasiveness, crucial for controlling the reduction amount:
| Color | Thickness (mm) | Function |
|---|---|---|
| Yellow | 0.1 mm | Very fine finishing |
| Red | 0.12 – 0.15 mm | Fine IPR or smoothing |
| Blue | 0.2 mm | Moderate enamel removal |
How to Measure IPR Accurately?
After doing IPR, it is essential to check the amount of enamel removed. This prevents excess stripping and ensures accuracy in treatment.
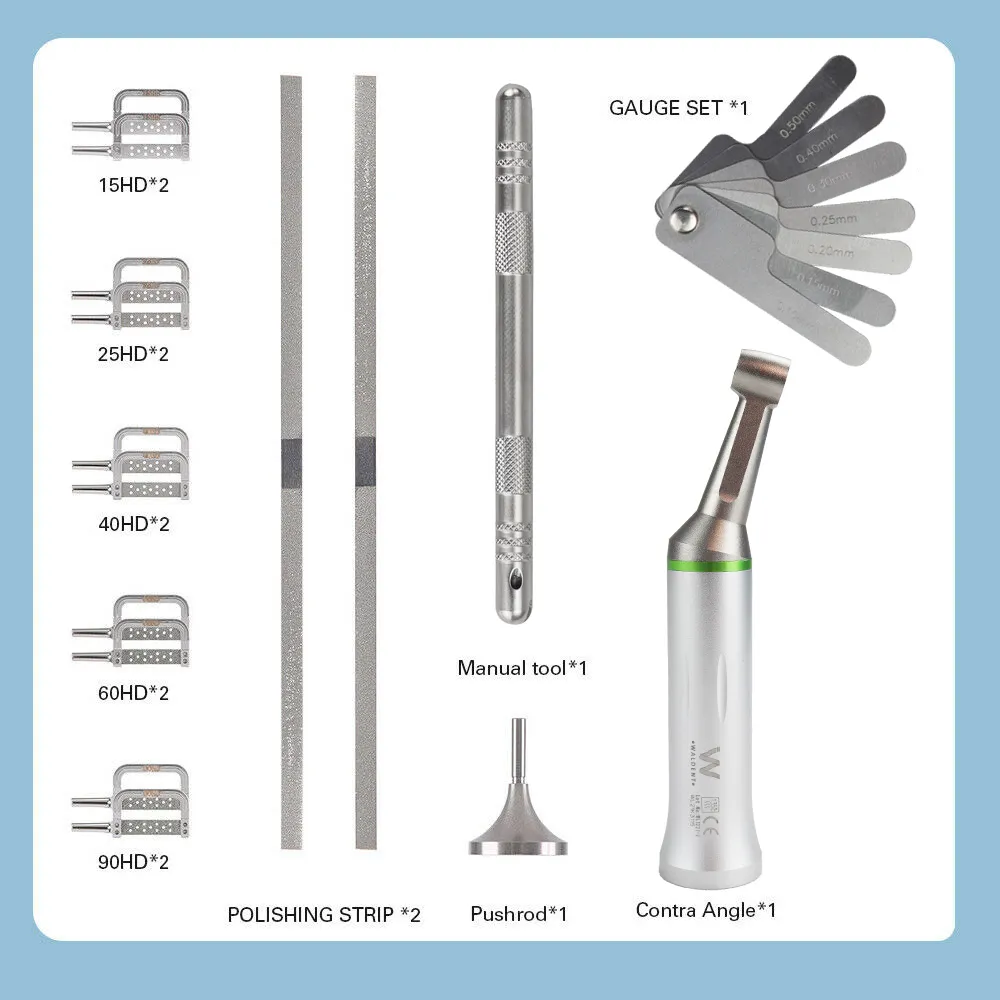
IPR Gauges are the most commonly used tools. They are metal feeler gauges with width indications (0.1 mm to 0.5 mm) to measure contact opening. The gauge must passively fit into the inter-proximal space.
Comprehensive All-in-One IPR Kits are available. Includes a full range of IPR burs, discs, and strips for efficient enamel reduction and gauges for accurate measurement of reduction.
Where to Buy Quality IPR Products?
You can purchase dental products online in India from reliable websites that offer:
- Genuine branded products
- Convenient search for IPR burs, IPR strips, and gauges
- Helpful product guides
- Reasonable prices
Search for a best online dental store in India that has good dental supplies online, such as IPR kits, dental materials, and accessories. Top sites such as Dentalkart are referred to as the best online dental store in India since they have all the way from IPR tools to dental lab equipment.
Final Thoughts
Interproximal reduction is a safe and effective method when performed within enamel saving limits. With proper dental equipment, measurement instruments, and gentle practice, you may obtain ideal orthodontic results without extractions and extensive treatments.
Frequently Asked Questions (FAQs)
No, IPR is generally painless because it involves only enamel; pulp is not involved.
Yes, it can be done with manual strips and saws, though it is slower.
You can buy them from the best dental store in India such as Dentalkart, who provide all the necessary IPR kits and accessories.
If done properly staying within the safe limits of enamel reduction and with fluoride application, it hardly causes sensitivity.
IPR should be performed using consecutive occluso-gingival strokes while simultaneously gliding the bur from the lingual to the buccal contact point.
It is important to ensure the smoothness of the post-IPR tooth surfaces by flossing through and against the contact areas of the teeth. Fraying of the floss indicates surface roughness or ledge formation. Surfaces should be smoothened using fine and extra-fine polishing strips.
Use an appropriately sized bur in one smooth motion through the contact area. Ensure you have a good occlusal view (perpendicular to the occlusal plane) while moving the bur to achieve uniform straight-line reduction. This will help avoid over-reduction caused by correcting angled cuts.
Dr. Noopur Agarwal and Dr. Nida Nayyer
Dr. Noopur Aggarwal
Author
Related Articles

Self-Etch vs. Selective-Etch vs Total-Etch: A Clinical Decision Guide for Everyday Restorations
IntroductionIn restorative dentistry, bonding success does not depend only on the composite resin or adhesive brand. More often than not, long-term success or f

Tissue-Level vs Bone-Level Implants: Clinical Selection Guide
In modern implantology, the debate isn't about which system is "better," but rather which design is most compatible with the patient’s specific anatomy. Implan

Paediatric Pulp Therapy: Guidelines & Best Materials (Pulpotomy / Pulpectomy)
Introduction to Pediatric Pulp Therapy In children, caries reaches the pulp fast because primary teeth have thinner enamel, dentin and larger pulp chambers.